You’ve seen it before, many times, on pictures throughout the world wide web. A seemingly transparent title or symbol positioned on an image. If you have Photoshop Elements 8 and want to do the same with text on your own images, what follows is a step by step procedure.
Why watermark your photos?
- Businesses that sell photos will watermark the product they put on the internet so if a customer wants the photo, they have to purchase the non-watermarked version.
- Advertisement. Watermarking your photos and ‘flooding’ the internet is a great way to get free advertisement for your business or website.
- It looks cool.
Today, we’re going to take a shot of the dock at Cayo Largo, Cuba and watermark ‘www.itsabouttravelling.com’ onto the photo. Open up Photoshop Elements 8 and follow along!
The photo before watermarking:
The photo after watermarking:
Open up the original photo. You can either save your watermarked copy with a different file name now or when the process is completed. If you want an original without watermarking, DO NOT forget to save as a separate file.
This is the photo opened in PSE8:
Select the Text button on the left side toolbar (the big T) and drag to create a text box somewhere in the photo. It doesn’t matter where you make your text box – once you insert your text, you can position it anywhere on the photo.
Choose your font, size and text colour. Whatever your font, you should choose ‘bold’. I use Verdana for a lot of writing so that’s what I’ve chosen in this example. The size is up to you. I like to choose a size that’s noticeable but doesn’t take too much away from the photo.
Note: Font size range will change with the size of the photo. For a larger photo than this one, 36 point will probably not be big enough. On really high res photos, the maximum 72 point text is sometimes at the point of being insignificant.
Your text colour should be 50% gray (top right of the colour grid when you click on the colour button).
This is what we’ve got so far:
When you have your text the way you want it, click the green checkmark to commit.
If you want to reposition your text, click the move button in the left hand tool bar:
I’ve moved my text to the blue sky at the upper right of the photo:
In the effects box on the right hand side, click layer styles (the selected box below with the layer over the other layer). Choose ‘Bevels’ from the drop down box and the set of nine bevel styles shown below will pop up.
I use ‘simple inner’ (third from the left on the upper row). In the layers box at the bottom of the screen, make sure you have the text layer selected (big T with white background).
This is the result of choosing the ‘simple inner’ bevel:
At the bottom right of your screen in the Layers palette, change from default ‘normal’ to ‘hard light’ in the drop down box:
‘Hard light’ makes the text seem transparent. This is the result of choosing ‘hard light’:
You can stick with this if you want. If you want to do some extra effects, click on the text layer then double click the ‘fx’ at the right.
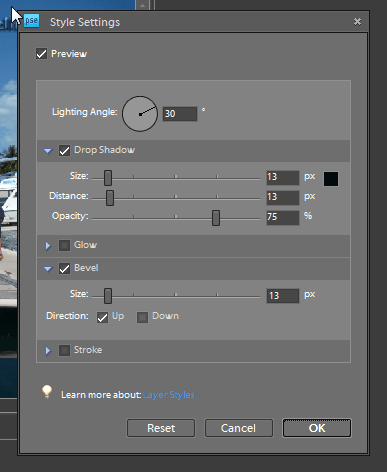
From here, you can change aspects of your watermark. I often choose ‘Drop Shadow’ to make the text stand out a little better when it crosses several colours in the photo. Play with the functions on this screen to find the settings that suit you.
I’ve selected ‘Drop Shadow’ and will now select OK at the bottom of the box:
This is the result:
If satisfied with your work, from the toolbar that runs along the top of the screen, select ‘Layer’. At the bottom of the drop down, select ‘flatten image’. This will merge your two layers into a single, saveable image.
With your final product, you will have a watermarked picture on the screen and only one layer in the layers palette at the bottom right. This is what the full screen will look like:
Time to save the image. If you haven’t already saved a separate copy of your watermarked image, select ‘save as’ from the drop down when you click ‘file’ from the top toolbar. Don’t forget to change the name of the image or it will overwrite your original.
This screen will pop up when you save. You can change the options if you wish but all you really need to do is click ‘OK’.
Done. You’ve just watermarked you image with text. This is just one way but it provides the basic path you need to follow. Play around with the options along the way to get the perfect watermark you’re looking for. You can do this with another image or logo but that’s for another article…
Check it this following Video on the process of inserting a text watermark into an image. Be sure to switch to the highest quality level and be sure to hit the ‘Like’ button!


